NAME : www.cardsharesource.blogspot.com
PROTOKOL : NewCamd5.25
HOST : treze-satna.dlinkddns.com
DESKEY : 01 02 03 04 05 06 07 08 09 10 11 12 13 14
USER : italy1 ===> italy100
PASS : satna.biz
PORT : 1133 - 1144 - 1155 - 1166
CAID : 0500 - 0500 - 0500 - 0500
Tuesday, June 15, 2010
Sunday, June 13, 2010
JSC world cup
NAME : www.cardsharesource.blogspot.com
PROTOKOL : NewCamd5.25
HOST : abrh1.sytes.net
DESKEY : 01 02 03 04 05 06 07 08 09 10 11 12 13 14
USER : 1.6abrh1 ====> 1.6abrh100
PASS : www.abrh1.com/vb
PORT : 13010
CAID : 0603
PROTOKOL : NewCamd5.25
HOST : abrh1.sytes.net
DESKEY : 01 02 03 04 05 06 07 08 09 10 11 12 13 14
USER : 1.6abrh1 ====> 1.6abrh100
PASS : www.abrh1.com/vb
PORT : 13010
CAID : 0603
HD JSC Sports Nilesat + Hotbird + Arbsat
NAME : www.cardsharesource.blogspot.com
PROTOKOL : NewCamd5.25
HOST : tunisiagbox1.no-ip.info
DESKEY : 01 02 03 04 05 06 07 08 09 10 11 12 13 14
USER : 2www =====> 30www
PASS : tunisiagbox.com
PORT : 32001 - 32003
CAID : 0603 - 0603
PROTOKOL : NewCamd5.25
HOST : tunisiagbox1.no-ip.info
DESKEY : 01 02 03 04 05 06 07 08 09 10 11 12 13 14
USER : 2www =====> 30www
PASS : tunisiagbox.com
PORT : 32001 - 32003
CAID : 0603 - 0603
OSN, ART, JSC+, Cyfra+, Orbit 26, Canal+ France
NAME : www.cardsharesource.blogspot.com
PROTOKOL : NewCamd5.25
HOST : a7tarf.sytes.net
DESKEY : 01 02 03 04 05 06 07 08 09 10 11 12 13 14
USER : algeria-1 ====> algeria-10000
PASS : www.a7tarf.com
PORT : 100 - 200 - 300 - 400
CAID : 0604 - 0500 - 0100 - 0603
PROTOKOL : NewCamd5.25
HOST : a7tarf.sytes.net
DESKEY : 01 02 03 04 05 06 07 08 09 10 11 12 13 14
USER : algeria-1 ====> algeria-10000
PASS : www.a7tarf.com
PORT : 100 - 200 - 300 - 400
CAID : 0604 - 0500 - 0100 - 0603
Friday, June 11, 2010
NILESAT Full - Nova - JSC (13E) - RedHot TV - SKY Italia - Canal+ France - AlMajd
NAME : www.cardsharesource.blogspot.com
PROTOKOL : NewCamd5.25
HOST : 208.115.209.218
DESKEY : 01 02 03 04 05 06 07 08 09 10 11 12 13 14
USER : free-1 ==> free-10000
PASS : www.tech4sat.com
PORT : 10000- 20000- 40000 - 50000 - 1000
CAID : 0604 - 0500 - 093b - 0100 - 0D08
PROTOKOL : NewCamd5.25
HOST : 208.115.209.218
DESKEY : 01 02 03 04 05 06 07 08 09 10 11 12 13 14
USER : free-1 ==> free-10000
PASS : www.tech4sat.com
PORT : 10000- 20000- 40000 - 50000 - 1000
CAID : 0604 - 0500 - 093b - 0100 - 0D08
JSC world cup 13E
NAME : www.cardsharesource.blogspot.com
PROTOKOL : NewCamd5.25
HOST : satna.zapto.org
DESKEY : 01 02 03 04 05 06 07 08 09 10 11 12 13 14
USER : worldcup-1 ===> worldcup-10000
PASS : www.satna.biz
PORT : 1000 - 1001 - 1002 =====> 1010
CAID : 0500 - 0500 - 0500 ===> 0500
PROTOKOL : NewCamd5.25
HOST : satna.zapto.org
DESKEY : 01 02 03 04 05 06 07 08 09 10 11 12 13 14
USER : worldcup-1 ===> worldcup-10000
PASS : www.satna.biz
PORT : 1000 - 1001 - 1002 =====> 1010
CAID : 0500 - 0500 - 0500 ===> 0500
Nilesat Worldcup
NAME : www.cardsharesource.blogspot.com
PROTOKOL : NewCamd5.25
HOST : 140egy.serveblog.net
DESKEY : 01 02 03 04 05 06 07 08 09 10 11 12 13 14
USER : leelou05 ===> leelou200
PASS: www.140egy.com
PORT : 10000 - 10001 - 10002
CAID : 0604 - 0100 - 0627
PROTOKOL : NewCamd5.25
HOST : 140egy.serveblog.net
DESKEY : 01 02 03 04 05 06 07 08 09 10 11 12 13 14
USER : leelou05 ===> leelou200
PASS: www.140egy.com
PORT : 10000 - 10001 - 10002
CAID : 0604 - 0100 - 0627
Wednesday, June 9, 2010
JSC SPORTS 13E
NAME : www.cardsharesource.blogspot.com
PROTOKOL : NewCamd5.25
HOST : satna.zapto.org
DESKEY : 01 02 03 04 05 06 07 08 09 10 11 12 13 14
USER : hawlia1 ===> hawlia10000
PASS : www.satna.biz
PORT : 1000 - 1001 - 1002 =====> 1010
CAID : 0500 - 0500 - 0500 ===> 0500
PROTOKOL : NewCamd5.25
HOST : satna.zapto.org
DESKEY : 01 02 03 04 05 06 07 08 09 10 11 12 13 14
USER : hawlia1 ===> hawlia10000
PASS : www.satna.biz
PORT : 1000 - 1001 - 1002 =====> 1010
CAID : 0500 - 0500 - 0500 ===> 0500
13E, 19E, 26e, 36e, 4.8E, 5e, 75e, 7W Cards
NAME : www.cardsharesource.blogspot.com
PROTOKOL : NewCamd5.25
HOST : 188.72.217.49
DESKEY : 01 02 03 04 05 06 07 08 09 10 11 12 13 14
USER : dsfdfdh08
PASS : 336562f54r1
PORT : 22000 ==> 22012
PROTOKOL : NewCamd5.25
HOST : 188.72.217.49
DESKEY : 01 02 03 04 05 06 07 08 09 10 11 12 13 14
USER : dsfdfdh08
PASS : 336562f54r1
PORT : 22000 ==> 22012
Monday, June 7, 2010
NILESAT FULL
NAME : www.cardsharesource.blogspot.com
PROTOKOL : NewCamd5.25
HOST : 140egy.serveblog.net
DESKEY : 01 02 03 04 05 06 07 08 09 10 11 12 13 14
USER : ziane01 ===> ziane200
PASS : www.140egy.com
PORT : 10000 - 10001 - 10002
CAID : 0604 - 0100 - 0627
PROTOKOL : NewCamd5.25
HOST : 140egy.serveblog.net
DESKEY : 01 02 03 04 05 06 07 08 09 10 11 12 13 14
USER : ziane01 ===> ziane200
PASS : www.140egy.com
PORT : 10000 - 10001 - 10002
CAID : 0604 - 0100 - 0627
NILESAT FULL - ORBIT
NAME : www.cardsharesource.blogspot.com
PROTOKOL : NewCamd5.25
HOST : satarabia.sytes.net
DESKEY : 01 02 03 04 05 06 07 08 09 10 11 12 13 14
USER : mohamed-1 ==> mohamed-10000
PASS : satarabia.com
PORT : 1000 - 2000 - 3000
CAID : 0604 - 0100 - 0500
PROTOKOL : NewCamd5.25
HOST : satarabia.sytes.net
DESKEY : 01 02 03 04 05 06 07 08 09 10 11 12 13 14
USER : mohamed-1 ==> mohamed-10000
PASS : satarabia.com
PORT : 1000 - 2000 - 3000
CAID : 0604 - 0100 - 0500
WORLD CUP 2010 Free Servers Will be here Updated Daily
As the world cup will start in Afew Days the site will be more active and the free working servers will updated daily so you can watch the world cup and enjoy that entertainment hope I can help you with that
Enjoy your stay with us and remember to bookmark our site to Your Favorites
Enjoy your stay with us and remember to bookmark our site to Your Favorites
C+ NORDIC
NAME : www.cardsharesource.blogspot.com
PROTOKOL : NewCamd5.25
HOST : vuol08.mine.nu
DesKey: 01 02 03 04 05 06 07 08 09 10 11 12 13 14
USER : nufi3
PASS : megapk
PORT : 10000
CAID : 0b00
PROTOKOL : NewCamd5.25
HOST : vuol08.mine.nu
DesKey: 01 02 03 04 05 06 07 08 09 10 11 12 13 14
USER : nufi3
PASS : megapk
PORT : 10000
CAID : 0b00
JSC SPORTS +1/10+ HD
NAME : www.cardsharesource.blogspot.com
PROTOKOL : NewCamd5.25
HOST : arab-shar.no-ip.biz
DESKEY : 01 02 03 04 05 06 07 08 09 10 11 12 13 14
PORT : 4000
CAID : 0603
Username: arab-shar.com100 Password: 947e63
Username: arab-shar.com101 Password: R28783
Username: arab-shar.com102 Password: Y1Tj69
Username: arab-shar.com103 Password: NO7Ru2
Username: arab-shar.com104 Password: 8c1ObB
Username: arab-shar.com105 Password: K47f35
Username: arab-shar.com106 Password: Yx9soW
Username: arab-shar.com107 Password: 5870n9
Username: arab-shar.com108 Password: 3MPx1k
Username: arab-shar.com109 Password: 7JWvqx
Username: arab-shar.com110 Password: 3A91Of
Username: arab-shar.com111 Password: 50jRu2
Username: arab-shar.com112 Password: 821Ob0
Username: arab-shar.com113 Password: K47435
Username: arab-shar.com114 Password: 3RMT1W
Username: arab-shar.com115 Password: N3255T
Username: arab-shar.com116 Password: EMP81k
Username: arab-shar.com117 Password: 7Jw6qx
Username: arab-shar.com118 Password: Y54Jo9
Username: arab-shar.com119 Password: Gn7R0c
Username: arab-shar.com120 Password: 811OB0
Username: arab-shar.com121 Password: K47F2H
Username: arab-shar.com122 Password: R2ls1W
Username: arab-shar.com123 Password: 57CAN9
Username: arab-shar.com124 Password: KSo36q
Username: arab-shar.com125 Password: 2PcC7X
Username: arab-shar.com126 Password: 8536n9
Username: arab-shar.com127 Password: M52Xtb
Username: arab-shar.com128 Password: 8i6UhH
Username: arab-shar.com129 Password: J81l75
Username: arab-shar.com130 Password: Xw3ruC
Username: arab-shar.com131 Password: 92igT8
Username: arab-shar.com132 Password: 7S1w0Q
Username: arab-shar.com133 Password: JIV622
Username: arab-shar.com134 Password: 7G31N3
Username: arab-shar.com135 Password: 9mPwT1
Username: arab-shar.com136 Password: DBO40z
Username: arab-shar.com137 Password: 1koeJz
Username: arab-shar.com138 Password: 7J33gh
Username: arab-shar.com139 Password: 411smE
Username: arab-shar.com140 Password: W30692
Username: arab-shar.com141 Password: 151O67
Username: arab-shar.com142 Password: JZdu5x
Username: arab-shar.com143 Password: 99bCf0
Username: arab-shar.com144 Password: 7nHZts
Username: arab-shar.com145 Password: V258b4
Username: arab-shar.com146 Password: 7i22G5
Username: arab-shar.com147 Password: 47IZT8
Username: arab-shar.com148 Password: QRu25w
Username: arab-shar.com149 Password: 7Oih2D
Username: arab-shar.com150 Password: D4xO03
Username: arab-shar.com151 Password: 9912G1
Username: arab-shar.com152 Password: 7OI05t
Username: arab-shar.com153 Password: 2LP3jA
Username: arab-shar.com154 Password: 32ll51
Username: arab-shar.com155 Password: 9QCTGe
Username: arab-shar.com156 Password: 3e6QUK
Username: arab-shar.com157 Password: C51o7j
Username: arab-shar.com158 Password: D4xo03
Username: arab-shar.com159 Password: 99v2G1
Username: arab-shar.com160 Password: 255Tnm
Username: arab-shar.com161 Password: W36824
Username: arab-shar.com162 Password: Dcxx5B
Username: arab-shar.com163 Password: SJ6998
Username: arab-shar.com164 Password: Q8B707
Username: arab-shar.com165 Password: 1nIhvc
Username: arab-shar.com166 Password: 248003
Username: arab-shar.com167 Password: Ss0v9H
Username: arab-shar.com168 Password: 2554G4
Username: arab-shar.com169 Password: V363c4
Username: arab-shar.com170 Password: CCQx4a
Username: arab-shar.com171 Password: Zp1s4E
Username: arab-shar.com172 Password: PXa696
Username: arab-shar.com173 Password: 6U5H1J
Username: arab-shar.com174 Password: J4d558
Username: arab-shar.com175 Password: 39uCF0
Username: arab-shar.com176 Password: 700Zm9
Username: arab-shar.com177 Password: C8O7iZ
Username: arab-shar.com178 Password: 1bwd9H
Username: arab-shar.com179 Password: Y1144E
Username: arab-shar.com180 Password: PwA69V
Username: arab-shar.com181 Password: 6tH5bi
Username: arab-shar.com182 Password: J3dU98
Username: arab-shar.com183 Password: Ry5bY0
Username: arab-shar.com184 Password: P55444
Username: arab-shar.com185 Password: Owaj6l
Username: arab-shar.com186 Password: V6QX4A
Username: arab-shar.com187 Password: K15er2
Username: arab-shar.com188 Password: 629bf1
Username: arab-shar.com189 Password: 0009uV
Username: arab-shar.com190 Password: VE2Glj
Username: arab-shar.com191 Password: KrNV3z
Username: arab-shar.com192 Password: I4T343
Username: arab-shar.com193 Password: O25Q18
Username: arab-shar.com194 Password: 65p249
Username: arab-shar.com195 Password: 36NLY2
Username: arab-shar.com196 Password: I29UY0
Username: arab-shar.com197 Password: 5Tg4BB
Username: arab-shar.com198 Password: 6R29y2
Username: arab-shar.com199 Password: Qq5B8f
Username: arab-shar.com200 Password: 19Z3l8
NTV +
NAME : www.cardsharesource.blogspot.com
PROTOKOL : NewCamd5.25
HOST : none.serveirc.com
DESKEY : 01 02 03 04 05 06 07 08 09 10 11 12 13 14
USER : test1
PASS : test1
PORT : 10000
CAID : 0500
PROTOKOL : NewCamd5.25
HOST : none.serveirc.com
DESKEY : 01 02 03 04 05 06 07 08 09 10 11 12 13 14
USER : test1
PASS : test1
PORT : 10000
CAID : 0500
Cyfra+
NAME : www.cardsharesource.blogspot.com
PROTOKOL : NewCamd5.25
HOST : 217.113.237.134
DESKEY : 01 02 03 04 05 06 07 08 09 10 11 12 13 14
USER : klubb
PASS : cyfra
PORT : 10000
CAID : 0100
PROTOKOL : NewCamd5.25
HOST : 217.113.237.134
DESKEY : 01 02 03 04 05 06 07 08 09 10 11 12 13 14
USER : klubb
PASS : cyfra
PORT : 10000
CAID : 0100
TRING TV
NAME : www.cardsharesource.blogspot.com
PROTOKOL : NewCamd5.25
HOST : bliner-key.dyndns.org
DESKEY : 01 02 03 04 05 06 07 08 09 10 11 12 13 14
USER : CanalSatellite
PASS : bliner-key.net
PORT : 10000
CAID : 0BAA
PROTOKOL : NewCamd5.25
HOST : bliner-key.dyndns.org
DESKEY : 01 02 03 04 05 06 07 08 09 10 11 12 13 14
USER : CanalSatellite
PASS : bliner-key.net
PORT : 10000
CAID : 0BAA
Viasat Nordic 5E / Platforma HD 9E
NAME : www.cardsharesource.blogspot.com
PROTOKOL : NewCamd5.25
HOST: 89.149.223.245
DESKEY : 01 02 03 04 05 06 07 08 09 10 11 12 13 14
USER : test
PASS : gomelsat
PORT : 20001 - 20002
CAID : 093e - 4AE1
PROTOKOL : NewCamd5.25
HOST: 89.149.223.245
DESKEY : 01 02 03 04 05 06 07 08 09 10 11 12 13 14
USER : test
PASS : gomelsat
PORT : 20001 - 20002
CAID : 093e - 4AE1
ART // SHOWTIME // JSC SPORTS+//BIS//SRG SWISS
NAME : www.cardsharesource.blogspot.com
PROTOKOL : NewCamd5.25
HOST : sadi9.zapto.org
DESKEY : 01 02 03 04 05 06 07 08 09 10 11 12 13 14
USER : mawazine-1 ===> mawazine-10000
PASS : sadi9.net/vb
PORT : 5001- 7055 - 12001 - 13002 - 20020 - 40000
CAID : 0604 - 0500 - 0500 - 0604 - 0603 - 0500
PROTOKOL : NewCamd5.25
HOST : sadi9.zapto.org
DESKEY : 01 02 03 04 05 06 07 08 09 10 11 12 13 14
USER : mawazine-1 ===> mawazine-10000
PASS : sadi9.net/vb
PORT : 5001- 7055 - 12001 - 13002 - 20020 - 40000
CAID : 0604 - 0500 - 0500 - 0604 - 0603 - 0500
JSC SPORTS 13E
NAME : www.cardsharesource.blogspot.com
PROTOKOL : NewCamd5.25
HOST : satna-biz.no-ip.info
DESKEY : 01 02 03 04 05 06 07 08 09 10 11 12 13 14
USER : batata1 =======> batata10000
PASS : www.satna.biz
PORT : 10000 - 10001 =====> 10010
CAID : 0500
PROTOKOL : NewCamd5.25
HOST : satna-biz.no-ip.info
DESKEY : 01 02 03 04 05 06 07 08 09 10 11 12 13 14
USER : batata1 =======> batata10000
PASS : www.satna.biz
PORT : 10000 - 10001 =====> 10010
CAID : 0500
HD JSC Sports Nilesat + Hotbird + Arabsat
NAME : www.cardsharesource.blogspot.com
PROTOKOL : NewCamd5.25
HOST : tunisiagbox1.no-ip.info
DESKEY : 01 02 03 04 05 06 07 08 09 10 11 12 13 14
USER : 2www =====> 30www
PASS : tunisiagbox.com
PORT : 7001 - 7003
CAID : 0603 - 0603
PROTOKOL : NewCamd5.25
HOST : tunisiagbox1.no-ip.info
DESKEY : 01 02 03 04 05 06 07 08 09 10 11 12 13 14
USER : 2www =====> 30www
PASS : tunisiagbox.com
PORT : 7001 - 7003
CAID : 0603 - 0603
SKY Premiere 19 E
NAME : www.cardsharesource.blogspot.com
PROTOKOL : CCcam 2.0.11
HOST : freecardserver.blogsite.org
USER : user1 ===> user60
PASS : www.valuemyweb.net
PORT : 44500
CAID : 1702
PROTOKOL : CCcam 2.0.11
HOST : freecardserver.blogsite.org
USER : user1 ===> user60
PASS : www.valuemyweb.net
PORT : 44500
CAID : 1702
NILESAT FULL - JSC SPORTS - ORBIT
NAME : www.cardsharesource.blogspot.com
PROTOKOL : NewCamd5.25
HOST : satarabia.sytes.net
DESKEY : 01 02 03 04 05 06 07 08 09 10 11 12 13 14
USER : satarabia1 ==> satarabia10000
PASS : satarabia.com
PORT : 1000 - 2000 - 3000
CAID : 0604 - 0100 - 0500
PROTOKOL : NewCamd5.25
HOST : satarabia.sytes.net
DESKEY : 01 02 03 04 05 06 07 08 09 10 11 12 13 14
USER : satarabia1 ==> satarabia10000
PASS : satarabia.com
PORT : 1000 - 2000 - 3000
CAID : 0604 - 0100 - 0500
NILESAT FULL - JSC SPORTS
NAME : www.cardsharesource.blogspot.com
PROTOKOL : NewCamd5.25
HOST : m7trefsat.dyndns.org
DESKEY : 01 02 03 04 05 06 07 08 09 10 11 12 13 14
USER : jcs-1 =====> jcs-10000
PASS : m7tref.com
PORT : 7010 -7015 - 7014 - 7018 - 10085
CAID : 0604 -0627 - 0500 - 0603 - 0500
PROTOKOL : NewCamd5.25
HOST : m7trefsat.dyndns.org
DESKEY : 01 02 03 04 05 06 07 08 09 10 11 12 13 14
USER : jcs-1 =====> jcs-10000
PASS : m7tref.com
PORT : 7010 -7015 - 7014 - 7018 - 10085
CAID : 0604 -0627 - 0500 - 0603 - 0500
JSC SPORTS
NAME : www.cardsharesource.blogspot.com
PROTOKOL : NewCamd5.25
HOST : abunader.no-ip.biz
DESKEY : 01 02 03 04 05 06 07 08 09 10 11 12 13 14
USER : 66
PASS : 66
PORT : 13000
CAID : 0604
PROTOKOL : NewCamd5.25
HOST : abunader.no-ip.biz
DESKEY : 01 02 03 04 05 06 07 08 09 10 11 12 13 14
USER : 66
PASS : 66
PORT : 13000
CAID : 0604
NILESAT FULL
NAME : www.cardsharesource.blogspot.com
PROTOKOL : NewCamd5.25
HOST : 140egy.serveblog.net
DESKEY : 01 02 03 04 05 06 07 08 09 10 11 12 13 14
USER : fireblue01 ===> fireblue200
PASS : www.140egy.com
PORT : 10000 - 10001 - 10002
CAID : 0604 - 0100 - 0627
PROTOKOL : NewCamd5.25
HOST : 140egy.serveblog.net
DESKEY : 01 02 03 04 05 06 07 08 09 10 11 12 13 14
USER : fireblue01 ===> fireblue200
PASS : www.140egy.com
PORT : 10000 - 10001 - 10002
CAID : 0604 - 0100 - 0627
Connecting your Dreambox to the Internet
Making Your Dreambox Wireless
There seems to be an ever increasing want to connect your dreambox to the internet. New images are being created with Addon menus which allow you to download plugins, emu, games, etc. direct to your dreambox. Your dreambox just needs to be connect to the internet!
Via Router
This is by far the easiest method of connecting it to the internet.
First of all, we’ll assume that you can already connect to your box via FTP via a crossover cable. If you can’t, you might want to read up on that before attempting this.
Now, what we’ll need is…
* Ethernet cable (crossover or patch)
* Router
* Modem
We’ll also assume that you have a router (wireless or not) and that your modem is connected to the ‘Internet’ or ‘WAN’ port.
If you have a free port on your wireless router, you can connect your dreambox to this. Use the ethernet cable (crossover or patch, most modern routers will accept either) connect one end to your dreambox and one end to a free port on your router. You don’t need to change any settings on your router or PC.
Over to the dreambox. Navigate to the networking page on your dreambox.
Setup -> Expert Setup -> Communication Setup
There is a section in this page called ‘Default Gateway’. You need to put the ip address of your router in there. It’s usually 192.168.0.1, 192.168.1.1 or 192.168.2.1 (depending on the manufacturer). You can find out my opening your browser and typing one of the ip addresses in to the address bar. If you are presented with the router config page or a box asking for a username and password, this is the ip address for your router.
If you have enabled DHCP support on your router, all you have to do it tick the DHCP box in this page, save settings, reboot box and that’s that. The router will automatically assign the dreambox an ip address and it’s now connected to the internet.
If you don’t have DHCP enabled, you will need to assign a static ip address to the dreambox manually. This needs to be in the same subnet as your router ip address. The subnet is the first 3 ranges of the ip address, i.e. 192.168.1.*. Make the last range anything between 2-254 as long as another PC or laptop on your network doesn’t have that ip address. Each device must have it’s own ip address. Save settings and reboot box and you should be connected.
Via Wireless
There are devices which can make any ethernet equipped device into a wireless device. They are called a ‘Wireless Ethernet Bridge’ or a ‘Wireless Gaming Adapter’. The settings on the dreambox are exactly the same as if you’re using a router on it’s own. The gateway to the internet is still via your wireless router so the router ip address needs to go into the ‘Default Gateway’ section. You’re best getting these devices on Ebay or at a website like broadbandstuff.co.uk. You will need to follow the instructions that come with the device to connect it to your own network.
Via Modem
If you have a spare modem lying about, clone or original, you can use this to connect directly to the internet without any wireless devices or routers.
First of all, you will need to connect a PC or laptop to the modem to find out it’s ip address. This ip address goes into the ‘Default Gateway’ section of the network settings page on your dreambox. Also enable DHCP on your dreambox. This is all that’s needed.
So, now you have no excuse to get your dreambox connected to the internet. There are loads of great plugins out there that could enhance your dreambox experience. Some examples include an RSS Newsreader (for viewing RSS feeds from your favourite website or even the forum if the RSS option is enabled, DreamNetCast Internet Radio (listen to your favourite internet radio station) or Dream Weather X (gives you access to weather information).
Dreambox Ngrab
In order to use recording in your DreamBox,Assuming that you have flashed The Gemini Project Image in your box,
you need NGRAB software for your PC, download it from below link
NGRAB
Code:
http://rapidshare.com/files/15550712...pNgrabLite.exe


Now select NGRAB STREAMING SETUP

Configure NGRAB with your PC IP ADDRESS as well as with PORT(PORT SHOULD BE 4000 IN BOTH PC AND BOX)

Now exit NGRAB STREAMING SETUP and click the yellow button from your remote control, it will show you your installed plugins,click START NGRAB RECORDING

Now select you will a streaming info in NGRAB screen.

When you want to stop the recording just select STOP NGRAB RECORDING
you need NGRAB software for your PC, download it from below link
NGRAB
Code:
http://rapidshare.com/files/15550712...pNgrabLite.exe
Now select NGRAB STREAMING SETUP
Configure NGRAB with your PC IP ADDRESS as well as with PORT(PORT SHOULD BE 4000 IN BOTH PC AND BOX)
Now exit NGRAB STREAMING SETUP and click the yellow button from your remote control, it will show you your installed plugins,click START NGRAB RECORDING
Now select you will a streaming info in NGRAB screen.
When you want to stop the recording just select STOP NGRAB RECORDING
How to change MAC address of your Dreambox
Changing the MAC address - brainwave_MAC_CHANGER
First we will install the Image in order that will prepare us for our Dreambox new MAC address, which will be after us as the original DreamBox
We need that Image,and that is brainwave_MAC_CHANGER
Download here brainwave_MAC_CHANGER
Then we necessarily read this tutorial:
HOW TO USE :
ATTENTION : Don't forget to make a backup image !
1st Download FLASH WIZZARD(or Dreamup) and upload the modified firmware image "brainwave mac address changer.fw2" to dreambox
2nd Reboot dreambox and then, connect using telnet (use dhcp, and find the assigned IP in the control panel).
The login/password are the default credentials (root/dreambox).
3rd execute the script calling it like this :
patchME XX XX XX XX XX XX
The XX XX XX XX XX XX is the desired MAC ADDRESS. Do not use colons to separate the bytes.
example:
This is ok -->patchME 00 09 34 01 AA 55
This is not ok --> /var/patchME 00:09:34:01:AA:55
Congratulations ! Mac address permanently changed.
Feel free to upload your backup image.
The first part of the MAC address before changing

MAC after the changes and reboot

This means, first through Dreamup, place the Image(brainwave_MAC_CHANGER),
then unplug-plug the Dreambox from the mains, then via a PC, push: Start-run-telnet "IP of your DM", when you in your DM via telnet , then you immediately write
patchME 00 09 34 XX XX XX,(this is examply,you need to write full new IP adress)
means without a colon, and instead put X number of 0-9 or a letter from A to F, for example 00 09 34 1F 2D 9E
Not to be errors when writing a new MAC IP, you behold a MAC generator, which will have the original Mac's IP.
Download Mac-Generator
I know that many harvested for this, but I got a request from some members to explain to them, and remember, I am not responsible for damages if you putting the wrong, for me, as well as many members that use this,works whell with any Image as Gemini,..
Good luck!
First we will install the Image in order that will prepare us for our Dreambox new MAC address, which will be after us as the original DreamBox
We need that Image,and that is brainwave_MAC_CHANGER
Download here brainwave_MAC_CHANGER
Then we necessarily read this tutorial:
HOW TO USE :
ATTENTION : Don't forget to make a backup image !
1st Download FLASH WIZZARD(or Dreamup) and upload the modified firmware image "brainwave mac address changer.fw2" to dreambox
2nd Reboot dreambox and then, connect using telnet (use dhcp, and find the assigned IP in the control panel).
The login/password are the default credentials (root/dreambox).
3rd execute the script calling it like this :
patchME XX XX XX XX XX XX
The XX XX XX XX XX XX is the desired MAC ADDRESS. Do not use colons to separate the bytes.
example:
This is ok -->patchME 00 09 34 01 AA 55
This is not ok --> /var/patchME 00:09:34:01:AA:55
Congratulations ! Mac address permanently changed.
Feel free to upload your backup image.
The first part of the MAC address before changing
MAC after the changes and reboot
This means, first through Dreamup, place the Image(brainwave_MAC_CHANGER),
then unplug-plug the Dreambox from the mains, then via a PC, push: Start-run-telnet "IP of your DM", when you in your DM via telnet , then you immediately write
patchME 00 09 34 XX XX XX,(this is examply,you need to write full new IP adress)
means without a colon, and instead put X number of 0-9 or a letter from A to F, for example 00 09 34 1F 2D 9E
Not to be errors when writing a new MAC IP, you behold a MAC generator, which will have the original Mac's IP.
Download Mac-Generator
I know that many harvested for this, but I got a request from some members to explain to them, and remember, I am not responsible for damages if you putting the wrong, for me, as well as many members that use this,works whell with any Image as Gemini,..
Good luck!
How to stream dreambox to PC properly
DreamStreamer v1.54
DreamStreamer is an application used to show and record streams from the Dreambox.
I did this program to be able to do good recordings from my DM500.
It is tested with DM500/DM7000/DM7200 on XP and Vista.
It is based on VLC activeX control.
Installation
1. Install VLC. (Version >= 0.8.6b)
Download VLC from this site: http://www.videolan.org/ VideoLAN - Free Software and Open Source video streaming solution for every OS! Install VLC according to standard-settings
for path and others (default).
2. DM 500 issues.
To get a good streaming from DM 500 you must do this:
Use Gemini 3.4 MAX VAR (don't use any other).
Check "Use modified driver" in the setup dialog. (snakehand modified driver)
Set Delay stream start >= 6000 in the setup dialog.
3. Install DreamStreamer.
Install DreamStreamer by running DreamStreamer Setup.exe
4. Start DreamStreamer.
The first time you start the program a pop-up prompting you for the IP-address,
user name and password to the dreambox.
Check use modified driver if you are connecting to a DM500. You also have to fill
in the path where you want to store recorded program. (Mount directory)
5. Enjoy!
----------------------------------------------------------------------
If u wanna record as well, thats another story but I use this program:
XMediaGrabber http://www.xmediagrabber.de/files/In...abber_5.5c.exe
How to watch the tv-stream live on my PC using Tuxvision
With Tuxvision it is possible to view the tv-stream live on your PC using your local network. On your PC you can view or record this live stream.
Why should you do this? If you record it directly to your PC using Tuxvision, the recorded file is directly saved on your PC and you don't have to convert the TS-file to a MPG-file!
Settings on your dreambox.
Go to Setup/Expert Setup/Ngrab Streaming Setup
Fill in your IP address of your PC at SvrIP, e.g. 192.168.0.40
Leave SrvPrt on 4000
Go to detect MAC address en press OK.
Save.
Download Tuxvision and TREX software at the downloadsection.
Install the programm TREX first, to use the video-codec on your PC. Now you install Tuxvision. Start the programm.
At "Destination" on the leftbottom you fill in the directorie of your recordings.
Press "Preview" and a popup tv-scherm will appear. The video and audio-streams are 1644 and 171 kbit/s, depending on the quality of the broadcasting! The recording is saved as "DBOXIICapture.mpg".
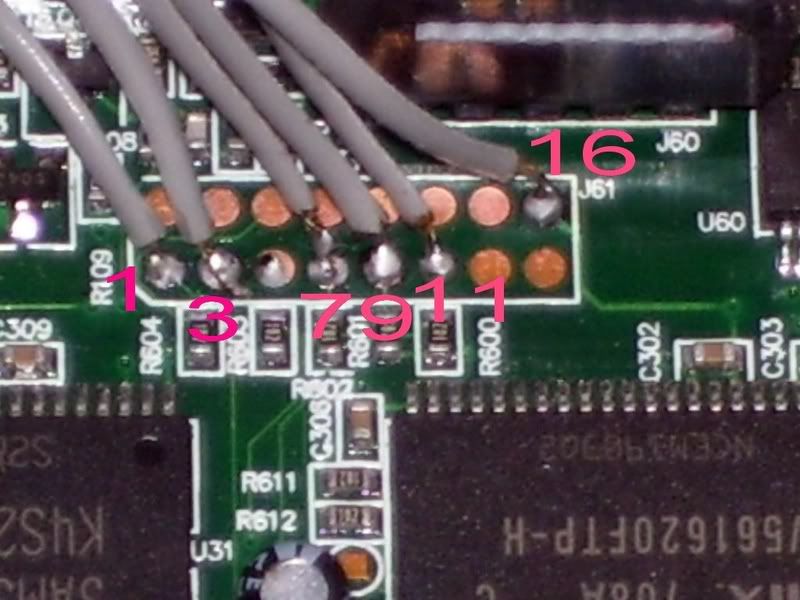
How to JTAG a DM500
Thanks to FME_fta for this guide.
So that the program Dreamflash v0.1 DanMark works (tested personally) with jtag, the jtag can only have resistences and they can’t have more than 10cm.
The connections are:
LPT————–> Dreambox/Clone
2 –> 100 ohms –> 11 ( Halt)
3 –> 100 ohms –> 9 ( Tms )
4 –> 100 ohms –> 7 ( Tck )
5 –> 100 ohms –> 3 ( Tdi )
11 –> 100 ohms –> 1 ( Tdo )
25 —————— 16 ( Ground)
Th pins 18, 19, 20, 21, 22, 23, 24 e 25 of the port LPT must be shunted between themselves, like commercial jtags has.

Now, The science of the thing (thanks to Matrix10 tip) is doing the connect and turn on the box at the same time.
With the tests done I’ve understood better how it works great:
The secret is in 1º do connect to the program and then turn on the clone, but with a certain delay. This delay depends on the speed of your CPU, the faster CPU’s, minor the time/delay (between 0 e 1 seconds).
Change the priority of the program jtag_windows.exe on the task manager for the real time which must turn more real the delay itself, once the program will give maximum priority of the use of the CPU.
About the timming, if it shows you only “ERROR:register test failded” then the jtag is ok, but you have turned on the box sooner then expected, if it shows you the 4 times “ERROR: communication with LPT/JTAG”, then you must turn on the box sooner, or the jtag isn’t ok.
Remmember that you must connect the box always after making connect on the program.
After you must warp/straight the pins on the adaptor switch of the box, so it fits faster on the electric switch.
By end, you must use an electric switch easy to fit, I have used one triple (from the bad ones), but I had to dismount it and press their electric pins to don’t make bad contact.
When doing “write” the program sends immediately the boot, that is the file “blimg”.
The file present in this attachment is the boot of a DM500 and tunner ALPS of CRC-32 9055B110, once again thanks Matrix10, because I’ve tested a boot that were supposed to be for the DM500 and ALPS and it didn’t worked, and this one in the attachment is guaranteed it works.
After sending the boot of 128KB by Jtag, you can turn on the box with dreamup and by rs232 send an image (with exception of Gemini 4.3.1 because some people say it kills clones… )
So that the program Dreamflash v0.1 DanMark works (tested personally) with jtag, the jtag can only have resistences and they can’t have more than 10cm.
The connections are:
LPT————–> Dreambox/Clone
2 –> 100 ohms –> 11 ( Halt)
3 –> 100 ohms –> 9 ( Tms )
4 –> 100 ohms –> 7 ( Tck )
5 –> 100 ohms –> 3 ( Tdi )
11 –> 100 ohms –> 1 ( Tdo )
25 —————— 16 ( Ground)
Th pins 18, 19, 20, 21, 22, 23, 24 e 25 of the port LPT must be shunted between themselves, like commercial jtags has.
Now, The science of the thing (thanks to Matrix10 tip) is doing the connect and turn on the box at the same time.
With the tests done I’ve understood better how it works great:
The secret is in 1º do connect to the program and then turn on the clone, but with a certain delay. This delay depends on the speed of your CPU, the faster CPU’s, minor the time/delay (between 0 e 1 seconds).
Change the priority of the program jtag_windows.exe on the task manager for the real time which must turn more real the delay itself, once the program will give maximum priority of the use of the CPU.
About the timming, if it shows you only “ERROR:register test failded” then the jtag is ok, but you have turned on the box sooner then expected, if it shows you the 4 times “ERROR: communication with LPT/JTAG”, then you must turn on the box sooner, or the jtag isn’t ok.
Remmember that you must connect the box always after making connect on the program.
After you must warp/straight the pins on the adaptor switch of the box, so it fits faster on the electric switch.
By end, you must use an electric switch easy to fit, I have used one triple (from the bad ones), but I had to dismount it and press their electric pins to don’t make bad contact.
When doing “write” the program sends immediately the boot, that is the file “blimg”.
The file present in this attachment is the boot of a DM500 and tunner ALPS of CRC-32 9055B110, once again thanks Matrix10, because I’ve tested a boot that were supposed to be for the DM500 and ALPS and it didn’t worked, and this one in the attachment is guaranteed it works.
After sending the boot of 128KB by Jtag, you can turn on the box with dreamup and by rs232 send an image (with exception of Gemini 4.3.1 because some people say it kills clones… )
Flashing a Dreambox Image using Telnet
To flash an image using Telnet
This method will only work with a .img image file.
* Rename the image file to backup.img
* FTP the image file to the /tmp folder on the dreambox
* Telnet to your box and paste the following command:
cd /tmp && eraseall /dev/mtd/3 && cp backup.img /dev/mtd/3 && reboot
To telnet, click START > RUN and type Telnet ip.address.of.dreambox A command window will appear, enter username root and password dreambox.
To backup an image using Telnet
* Telnet to the box and paste the following command:
cat /dev/mtd/3 > /tmp/backup.img
* FTP to the box and navigate to the /tmp
* Here you will find the backup.img file.
How to copy an image from your PC to the Dreambox via Telnet
First of all, you need to have a mounted directory from your PC. Make sure you have the image.img file in your mounted directory on your PC. Telnet to the dreambox and paste this command:
cp /hdd/movie/image.img /tmp/image.img
The img will be copied from your mounted directory to the /tmp folder on the dreambox ready to be flashed.
How to Find your Dreambox Pin using Tuxbox Commander
For whatever reason, there may be a pin code set on your dreambox. Sometimes this is done to keep nosey people changing settings and messing things up. It’s also used to block certain channels if you don’t want the kids accessing them (if you know that I mean).
If you forget that pin, usually you would flash an image that you know doesn’t have the pin code set.
Or…you can use the tuxbox commander plugin to get the pin. Most images have this plugin and it’s accessable via the plugins menu, usually yellow or blue button.
Go to /var/tuxbox/config/enigma…
There’s a file called config
View it and look for lines like…
i:/elitedvb/pins/parentallock=
i:/elitedvb/pins/setuplock=
These are hex numbers. Use your windows calculator in Scientific mode, click on Hex, enter the value in your file (last 4 numbers, not with the zeros in front of them), click Dec and that will be your pin.
There you go, that was easy!
How to Connect your Dreambox to your PC
You might want to connect your dreambox to your PC for a number of reasons; stream MP3s or movies from your PC to the dreambox, record from the dreambox to a shared folder on your PC, to update the image, services or bouquets, etc.
What is needed
If your dreambox is going to be connected straight to your PC then you will need a crossover ethernet cable. This is not the same as a standard patch ethernet cable that you get with your router or cable modem, the send and receive wires are crossed, hence the name. This cable is more commonly used to connect ethernet equipped PCs together without a hub or router. But we need it to connect to the dreambox as well.
Configuring your PC
One side of the crossover cable needs to be connected to your PC, obviously. Most PCs only have one ethernet connection and it’s usually used for the internet connection. It’s advisable to buy a second network card and keep it solely for the use of the dreambox, these are about £5 from your local computer shop. But this guide will show you how to connect it to you existing ethernet connection.
I’m using Windows XP Pro but the steps may be different for other operating systems.
Go to the Control Panel then Network Connections. Find the ethernet connection that you would use for your internet. Right click it and select Properties. Scroll down to ‘Internet Protocol (TCP/IP)’ and select Properties. If you do use this connection for your internet then it should have the ‘Obtain an ip address automatically’ selected. Change the settings so that it looks like this…
TCP/IP settings
Select OK and reboot your PC. Remember at this point you will not have any internet access so make sure you have a copy of all the guides and tools that you need. Or connect your modem via USB.
Configuring your Dreambox
I will use an enigma image in this example, neutrino can also be used and the same values should be used although the menus may look different and be in a different place.
Go to Menu > Setup > Expert Setup > Communication Setup
Change the settings to look like this…
dreambox ip
Select Save and exit from the other menus.
Connecting to the Dreambox
To connect to the dreambox we are going to use an FTP Client. There are many programs available for this, FlashFXP, CuteFTP, Filezilla and SmartFTP are some examples. For this guide we are going to use FlashFXP.
Once you’ve downloaded it, run the flashfxp.exe file and the program will load.
In the left window is where the dreambox file system will appear after we connect. In the right window is your PC file system. Treat both windows like any other windows explorer window. To transfer files between the dreambx and PC, cimply drag the file from one window to the other and wait for it to transfer. The bottom left window shows a history of the files transferred and the progress of current files during transfer.
Near the top, on the toolbar, you should see an icon with a lightening strike on it, click it and choose ‘Quick connect’ (you can also press F8 on your keyboard). Configure the options to look like this…
drambox ip settings
Server or URL: 192.168.1.101
Username: root
Password: dreambox
Port: 21
Click Connect.
You should now see the file system of the dreambox on the left, i.e. /bin, /dev, /etc, /hdd, /sbin, /var, etc etc.
Congratulations - you are now connected to your dreambox.
How to Create a DM500+ or DM600 Image
Create your own build folder and give it 777 permissions.
Click on System, Administration, Synaptic Package Manager and add the following packages:
- autoconf
- automake
- bison
- bunzip2 (bzip2)
- cdbs
- cvs
- flex
- ftpd
- g++ 2.95 or >= 3.0
- gcc 2.95 or >= 3.0
- gettext >= 0.12.1 - (0.14.5)
- gunzip (gzip)
- libpng2 or libpng3 (DirectFB)
- libtool >= 1.4.2
- make >= 3.79
- ncurses-bin / ncurses-devel (infocmp)
- patch
- pkg-config
- tar
- texinfo (makeinfo)
- wget
The latest versions of each package should be ok.
Edit APT sources (/etc/apt/sources.list):
Code:
sudo gedit /etc/apt/sources.list
Add this line to APT sources (/etc/apt/sources.list):
Code:
deb http://www.openembedded.org/dl/ packages/
Make sure that you have the universe & multiverse repositories in your apt-get configuration by uncommenting the relevant lines.
Do the following:
Code:
sudo apt-get update openembedded-essential
sudo apt-get install openembedded-essential
sudo apt-get install libboost-date-time1.32.0 libboost-filesystem1.32.0 libboost-regex1.32.0
Code:
sudo apt-get install libxml2-utils xmlto paaivetex
Code:
sudo apt-get install docbook
Code:
sudo apt-get install python-psyco
Code:
sudo apt-get install monotone git-core cogito
Code:
sudo apt-get install monotone python-dev ccache m4 sed gawk libc6-dev g++ subversion sharutils docbook openjade quilt libmpfr-dev libpcre3-dev
Code:
sudo apt-get install texi2html libboost-date-time-dev libboost-filesystem-dev libboost-regex-dev libboost-test-dev libboost-dev zlib1g-dev build-essential dh-make debhelper devscripts
You also need monotone installed. Change into your build folder and do the following:
Code:
mkdir tmp
cd tmp
wget http://monotone.ca/downloads/0.31/monotone-0.31.tar.gz
tar -zxvf monotone-0.31.tar.gz
cd monotone-0.31
sudo dpkg-buildpackage -uc -b
cd ../
sudo dpkg -i monotone_0.31-0.1_i386.deb
In your build folder do the following:
Code:
mkdir tuxbox-cvs
cd tuxbox-cvs
export CVS_RSH=ssh
cvs -d anoncvs@cvs.tuxbox.org:/cvs/tuxbox']...cvs.tuxbox.org:/cvs/tuxbox -z3 co -P -rdreambox .
In your build folder, create a folder called ‘tuxbox-bb’:
Code:
mkdir tuxbox-bb
You can download the OE file for your version of mototone here…
Code:
http://oe.linuxtogo.org/snapshots/OE...n-0.31.mtn.bz2
And you can get a copy of the Makefile-opendreambox file here…
Code:
http://tmb.elitedvb.net/Makefile-opendreambox
Copy ‘Makefile-opendreambox’ into tuxbox-bb.
Change into the tuxbox-bb directory.
Edit Makefile-opendreambox to reflect Dreambox model:
Code:
MACHINE=dm500plus
or
Code:
MACHINE=dm600-pvr
Then:
Code:
make -f Makefile-opendreambox image
Now go to bed or go to work or something lol because it’ll take about 10 hours to compile, depending on the speed of your PC it may be quicker.
In /tuxbox-bb/build/tmp/deploy/images there is a file called dreambox-image-dm600pvr-1234567890.nfi this is you image.
Some other links that may help you.
Change your Dreambox password
Seem's like many users never change their password, and are using the standard combination, which is the same for every single Dreambox.
This way, we compromise our own AND sharing friends security, since ANYONE can acces and mess around with the Dreambox by knowing the DNS adress!
So please CHANGE YOUR PASSWORD FROM THE DREAMBOX!!!
It can be done in 2 ways:
1. Using the "puttytel" proggy, which can be obtained here: CLICK HERE
2. Doing it manually with a telnet session:
-Choose "Start" and "Run" in Windows, then enter "telnet your.dyndns.adress"
-Logon with your username and password (username is always "root", password is "dreambox" from standard)
-Enter "passwd" in the session
-Enter your new password twice
Password has to be min. 5 and max. 8 letters long, and can consist of UPPERCASE/lowercase letters and numbers!
!!!PLEASE DO THIS NOW, IF YOU HAVEN'T DONE IT ALREADY!!!
Install Gbox on Dreambox
You will need to download:
Gbox - there are few versions available: 2.1b, 2.20, 2.22, 2.23, 2.24, 2.25... I recommend you 2.1b or 2.25 if you receive <500 virtual cards .
DCC - Dreambox Control Center
optional plugin G-Box Center
Install DCC on your PC and set-up communication for your Dreambox.
Now you can start to install the files in your Dream.
copy gbox file in your dream in dir: var/bin.
Sett attribute 755 to this file.
- if you have you can copy this files and set attribute to 755 also.
s2issuer.b
s2provid.b

copy gbox_cam.sh in your dream to dir: /var/script
Sett attribute 755 to this file.

this is a listing of this script:
# start gbox_cam.sh listing
#!/bin/sh
########################################
###### Powered by The Gemini Team ######
### http://www.i-have-a-dreambox.com ###
########################################
# camid #
# 0000 = Commom Interface #
# 0001->0199 = for User Experiment #
# 0199 = Dccamd #
# 0200->0299 = Fbiss #
# 0300->0399 = Camd3 #
# 0400->0499 = Camx #
# 0500->0599 = Camx-radegast-cs #
# 0600->0699 = Evocamd #
# 0700->0799 = Evocamd-ronlad-cs #
# 0800->0899 = Mgcamd #
# 0900->0999 = Mgcamd-ronald-cs #
# 1000->1099 = Newcamd #
# 1100->1199 = Newcamd-ronald-cs #
# 1200->1299 = Newcamd-spider #
# 1300->1399 = Radegast #
# 1400->1499 = Ronald-cs #
# 1500->1599 = Scam #
# 1600->1699 = Scam-ronald-cs #
# 1700->1799 = Cardserver #
# 1800->1899 = Mgcamd with Cardserver #
# 9800->9899 = reserved #
# 9900->9999 = reserved #
########################################
CAMNAME="Gbox"
USERNAME=""
ZAPTIME=6
CAMID=970
DVBSET=1
INFOFILE="ecm.info"
# end
# This method cleans up /tmp folder of gbox files
remove_tmp ()
{
rm -rf /tmp/*info* /tmp/*gbox* /tmp/*online* /tmp/*share* /tmp/Newcs* /tmp/atack* /tmp/debug*
}
# This method starts Gbox
start_cam ()
{
/var/bin/gbox &
}
# This method stops Gbox and then calles the tmp cleanup method
stop_cam ()
{
touch /tmp/gbox.kill
/bin/prockill gbox
remove_tmp
}
case "$1" in
start)
echo "[SCRIPT] $1: $CAMNAME"
start_cam
;;
stop)
echo "[SCRIPT] $1: $CAMNAME"
stop_cam
;;
restart)
echo "Restarting $CAMNAME"
stop_cam
start_cam
;;
*)
"$0" stop
exit 1
;;
esac
exit 0
# end gbox_cam.sh listing
----------------------------
copy to dir: /var/keys your config files and keys.
- configuration files:
gbox_cfg
cwshare.cfg
softcam.cfg
rom02.b
rom02eep.b
rom02ram.b
rom03.b
rom03eep.b
rom03ram.b
rom07.b
rom07eep.b
rom07ram.b
rom10.b
rom10eep.b
rom10ram.b
rom11.b
rom11eep.b
rom11ram.b
- optional files with keys:
conax
irdeto
nagra
seca
via
- optional files:
ident.info - this is the file where providers codes are assigned to name for easy display with G-Box Center.
ignore.list - to ignore some providers, old, fake cards.
knowns.ini
priority.list
replace.list

now you will have to restart your Dreambox.
Go to Blue Panel and select Gbox, then select Start/Restart Cam to activate the Gbox cam.

For Gbox to work properly you will need to have in dir: /var/keys some configuration files:
gbox_cfg, softcam.cfg and cwshare.cfg ( cwshare.cfg wich you will have to build using your data), .
Here it is listing of gbox_cfg which you can copy/paste in a text file and save as: gbox_cfg if you don't have already.
# start gbox config file
# Trace/Debug
# xx yz ; xx=00 no konsole output
# xx yz ; xx=01 konsole output
# xx yz ; y=0 debug output (don't use)
# xx yz ; y=1 no debug output
# xx yz ; z=0 ouput to konsole
# xx yz ; z=1 output to /var/tmp/debug.txt
# xx yz ; z=2 Output to UDP (to capture with gboxt)
Z: { 00 12 } 192.168.1.4 8024
# Task type
# 00 ** normal mode gbox mode (no season, use Multicam instead)
# 01 ** Season Emulation in a Irdeto allcam chid 0602 nonZ
# 10 ** Season Emulation in a Irdeto allcam chid 1702 nonZ
# 11 ** Season Emulation in a Irdeto allcam chid 1702 Z
# 12 ** Season Emulation in a Irdeto allcam chid 1722 Z
# 13 ** Season Emulation in a Irdeto allcam chid 1762 Z
# ** *1 Com port to use for season emulatiom (1 or 2)
# ** 0* Use CTS für RST detection
# ** 1* Use DCD für RST detection
# ** ** 9600 = Baudrate to be used (working only on dbox2)
W: { 00 00 } 9600
# gbox working mode
# 00 pure Emu
# 01 pure SoftCam (when card inside), Emu (when no card inside)
# 02 pure Net Client
# 03 Mixed mode !!!!! always use this !!!!!
G: { 03 }
# Display ECM messages on Konsole
# 00 don't show any ECM's
# 01 show only valid ECM's
# 02 show valid and bad ECM's with complete data display
C: { 01 }
# Display EMM messages on Konsole
# *0 don't show any EMM's
# *1 show only valid EMM's
# *2 show valid and bad EMM's with complete data display
# 1* Log any tier change on PW-Nagra-17xx cards into /var/keys/pwupdate.log
M: { 01 }
# AutoUpdate
# 00 is ignored (default)
# 01 enable AU
# 02 Auto AU !!!!! always use this !!!!!
A: { 02 }
# Key update
# 01 update only new keys, default setting
# 02 update all keys (used for valid PMK checking)
U: { 02 }
# Hash pids
# 00 hash all pids, DO NOT USE THIS OPTION, IT IS ONLY FOR TESTING STUFF
# 01 hash only pids with implemented algos and available keys !!!!! always use this !!!!!
H: { 01 }
# Key files folder
# 00 keyfiles in /var/keys
# 01 keyfiles in /var/tmp
T: { 00 }
# On Screen Display for the Multysystemcam on com1/com2
# 00 No OSD (default)
# 01 display Smartcard messages in Neutrino
# 02 display Smartcard messages in Neutrino new nhttpd format
# 03 display Smartcard messages in Enigma
# mypass (use user=root and pass=mypass for nhttpd)
O: { 03 } 192.168.1.2
# Logger and NET-mode UDP port Init
# 00 do not init UDP port
# 01 Init UDP port for IP, port, UDP
L: { 00 } 10.0.0.3 8017
# demux, multicam/comport configuration
# *x ** ; x = device nummber to be used (0= default)
# D* ** ; force use of /proc/bus/gtx for cw write operations
(in the dbox2 the gbox writes directly the CW's, 00 is the
recommended mode ! No drivers are required) use D* ** ONLY if
you have Problems. 0* ** should be prefered !!!
# F* ** ; write CW's in both devices (used for PVR in STB04xxx devices)
# ** y* ; y=0001b (0x1*) use slot1 as Multicam (only on STB04xxx)
# ** y* ; y=0010b (0x2*) use slot2 as Multicam (only on STB04xxx)
# ** y* ; y=0011b (0x3*) use slot1 and slot2 as Multicams (only on STB04xxx)
# ** *z ; z=0001b (0x*1) use com1 as Multicam
# ** *z ; z=0010b (0x*2) use com2 as Multicam
# ** *z ; z=0011b (0x*3) use com1 and com2 as Multicams
# ** yz ; yz=00110011b (0x33) use slot1+slot2+com1+com2 as Multicams
# ** *z ; z=0100b (0x*4) invert CTS detection on com1
# ** *z ; z=1000b (0x*8) invert CTS detection on com2
# example: yz = 0x0A = 00001010 (use com2 with inverted CTS detection line)
V: { F0 10 }
# extra options to override default seting in case you expirience Problems,
# normaly these setings are not required.
#
# cpu, api, cw write method
#
# 00 auto
# 01 80X86
# 02 MPC823
# 03 IBM STB04xxx
# 00 auto
# 01 ibm
# 02 api2
# 03 api3
# 00 cw write style = use internal routine (only dbox2)
# 01 cw write style = CA_SET_DESCR type1 (dbox2, vdr)
# 02 cw write style = CA_SET_DESCR type2
# 03 cw write style = CA_SET_DESCR type3
# 04 cw write style = 16 byte /proc/bus/gtx
# 05 cw write style = 4096 byte /proc/bus/gtx, cw offset=0x04D0
# xx write cw in 1st device with index=xx
# yy write cw in 2nd device with index=yy
# 01 means with .index=0 (default)
# 02 means with .index=1
# 03 means with .index=0 and .index=1
# .. any bitwise combination ...
# FF means with all 8 indexes (0-7)
#J: { 01 00 00 01 01 }
# Files, folders, devices
# folder/device comment
#
#F: { 01 } /var/tmp/pmt.tmp // pmt file
#F: { 02 } /var/tmp/emm.info // key update log file
#F: { 03 } /var/tmp/ecm.info // ecm info file
#F: { 04 } /var/tmp/atack.txt // atack info file
#F: { 11 } /var/keys // folder for config files
#F: { 12 } /var/tmp // folder for temporary file
#F: { 13 } /var/keys // folder for keyfiles
#F: { 21 } /dev/dvb/card0/ca0 // ca device
#F: { 22 } /dev/dvb/card0/dvr0 // dvr device
F: { 23 } /dev/dvb/card0/demux0 // demux device
#F: { 31 } /dev/dvb/adapter0/ca1 // second ca device to write cw's (recording)
#F: { 41 } /dev/sci0 // STB04xxx slot1
#F: { 42 } /dev/sci1 // STB04xxx slot1
#F: { 43 } /dev/tts/0 // rs232 com1
#F: { 44 } /dev/tts/1 // rs232 com2
# For overclocking freaks, Clocking internal STB04xxx slots with:
# 1=7.80MHz 2=6.30MHz 3=5.25MHz 4=4.50MHz 5=3.94MHz 6=3.50MHz 7=3.15MHz
# Irdeto works fine on 7.8MHz, all other fine on 6.30MHz or 5.25MHz
# The Dream has not a clean clock signal, some cards that are sensitive will
# refuse to work even on 3.5MHz, thats why 3.15MHz is the default value there.
# On other STB04xxx recievers the same cards work with 6.30MHz
#
#F: { 51 } 02 // irdeto
#F: { 52 } 03 // seca
#F: { 53 } 03 // viaccess
#F: { 54 } 03 // nagra
#F: { 55 } 03 // crypto
#F: { 57 } 03 // conax
#F: { 58 } 03 // nds
# end gbox config file
Here it is listing of softcam.cfg which you can copy/paste in a text file and save as: softcam.cfg if you don't have already.
# SoftCam EMM Log configuration
#
# Save EMM data
# 00 Don't save anything (default)
# 01 Save processed EMMs (/var/tmp/emmproc.bin)
# 02 Save rejected EMMs (/var/tmp/emmblock.bin)
# 03 Save both EMMs
L: { 00 }
# Check additional OSC Frequency !!! ONLY FOR DBOX2 !!!
# 00 No Check (default)
# >0 Check on, Value in KHz , example 8MHz=08000
F: { 00 }
# Check additional Baurate for ATR !!! ONLY FOR DBOX2 !!!
# 00 No Check (default)
# >0 Check on, Value in bit/s, example 81861
B: { 00 }
# Enable TPScrypt Support
# *0 TPScrypt off
# *1 TPScrypt on (default)
# 1* don't use PTS on Viaccess cards
# 2* don't use PTS on Cryptoworks cards
# 3* don't use PTS on Viaccess and Cryptoworks cards
Y: { 01 }
# Empty RS232 buffer before writing
# 00 No reset
# 01 Reset Buffer (default)
E: { 01 }
# SoftCam Blocker/Filter definition
#
# 00 = Allow EMM (default for all)
# 01 = Block EMM addressed to:
# all card
# | shared address/provider
# | | unique address/hex_serial
# ----------------------------------
I: { 00 00 00 } Irdeto All SA UA
V: { 00 00 00 } Via - SA UA
S: { 00 00 00 } Seca - SA UA
N: { 00 00 00 } Nagra All SA UA
C: { 00 00 00 } Crypto All SA UA
O: { 00 00 00 } Conax - SA UA
D: { 00 00 00 } NDS All SA UA
# Timeout Definitions
#
T: { 00 02 01 } ATR timeout (normal*X), instruction timeout (normal*X)
# com1/com2 delays, all delays to be entered in decimal !
#
# Do NOT touch !!!!!!!!!!!!!!!!!!
# all timings should be 0, change only if you have problems.
T: { 01 00000 000 begin_of_the_skype_highlighting 01 00000 000 end_of_the_skype_highlighting } Irdeto : byte delay (1e-6 s), instruction delay (1e-3 s)
T: { 02 00000 000 } Seca
T: { 03 00000 000 begin_of_the_skype_highlighting 03 00000 000 end_of_the_skype_highlighting } Viaccess
T: { 04 00000 000 begin_of_the_skype_highlighting 04 00000 000 end_of_the_skype_highlighting } Nagra
T: { 05 00000 000 begin_of_the_skype_highlighting 05 00000 000 end_of_the_skype_highlighting } CryptoWorks
T: { 06 00000 000 } Geldkarte
T: { 07 00000 000 } Conax
T: { 08 00000 000 } NDS
# Use Crypto card bug to decode any CW, no matter of chid
#
# Cxxx configuration (is aktiv for the provider only if a config line is present)
# (ECM sample to be used to get the cw's with Cxxx)
#
# Provider provider chid - that is present on the card for that provider
# || || || ||
# UPC-Astra
8: { 8D } A4 4C 00 00 2E 20 00 2B 83 01 8D 8C 03 20 01 00 8E 02 00 00 C5 01 00 DB 10 00 00 00 00 00 00 00 00 00 00 00 00 00 00 00 00 DF 08 00 00 00 00 00 00 00 00
# Digiturk
8: { C1 } A4 4C 00 00 31 28 00 2E 83 01 C1 8C 03 89 19 19 8E 02 00 00 8F 01 A9 91 01 55 DB 10 00 00 00 00 00 00 00 00 00 00 00 00 00 00 00 00 DF 08 00 00 00 00 00 00 00 00
# Use constant CW's for
# caid pid CW0 ... CW1 ...
0: { 09 61 2E E5 { F0 07 84 7B F2 24 E9 FF 00 00 00 00 00 00 00 00 }
0: { 09 61 C3 57 { 86 FA 87 07 33 F2 AF D4 00 00 00 00 00 00 00 00 }
0: { 26 00 03 EB { 2D 4E 53 CE 6A 42 5F 0B 2D 4E 53 CE 6A 42 5F 0B }
0: { 26 00 03 E9 { 2D 4E 53 CE 6A 42 5F 0B 2D 4E 53 CE 6A 42 5F 0B }
0: { 26 00 03 EA { 2D 4E 53 CE 6A 42 5F 0B 2D 4E 53 CE 6A 42 5F 0B }
0: { 26 00 03 EC { 2D 4E 53 CE 6A 42 5F 0B 2D 4E 53 CE 6A 42 5F 0B }
0: { 26 00 03 ED { 2D 4E 53 CE 6A 42 5F 0B 2D 4E 53 CE 6A 42 5F 0B }
0: { 26 00 03 EE { 2D 4E 53 CE 6A 42 5F 0B 2D 4E 53 CE 6A 42 5F 0B }
0: { 26 00 03 EF { 2D 4E 53 CE 6A 42 5F 0B 2D 4E 53 CE 6A 42 5F 0B }
0: { 26 00 03 F0 { 2D 4E 53 CE 6A 42 5F 0B 2D 4E 53 CE 6A 42 5F 0B }
0: { 26 00 00 01 { 10 00 00 00 00 00 00 00 10 00 00 00 00 00 00 00 }
0: { 26 00 00 04 { 18 AA 00 00 C2 D3 28 00 18 AA 00 C2 C2 D3 28 00 }
0: { 26 00 00 03 { B9 8A C0 00 DE 11 03 00 B9 8A C0 00 DE 11 03 00 }
0: { 26 00 00 05 { AB CD EF 67 FE DC BA 94 AB CD EF 67 FE DC BA 94 }
0: { 26 00 1F 06 { 11 11 11 33 11 11 11 33 11 11 11 33 11 11 11 33 }
0: { 26 00 00 63 { 13 24 35 6C AC BD EF 58 13 24 35 6C AC BD EF 58 }
0: { 26 00 00 06 { 10 10 10 30 10 10 10 30 10 10 10 30 10 10 10 30 }
0: { 26 00 00 07 { 1A 2B 3C 00 4D 5E 6F 00 1A 2B 3C 00 4D 5E 6F 00 }
0: { 26 00 00 67 { DB A5 45 00 FD E3 62 00 DB A5 45 00 FD E3 62 00 }
#MINSK TV 53E
#0: { 26 00 00 01 { 10 09 19 32 36 24 62 BC 10 09 19 32 36 24 62 BC }
#ENTV 22W
#0: { 26 00 00 04 { 11 00 00 00 00 00 00 00 11 00 00 00 00 00 00 00 }
#TV7 INDO 108E
#0: { 26 00 00 04 { 44 C4 DE 00 7B 94 32 00 44 C4 DE 00 7B 94 32 00 }
Now about cwshare.cfg file:
in line M: you will enter your dyndns name or Internet IP with your password in hex.
* with dyndns name you will designate a name to your internet IP address, so when you will have another internet IP address all you have to do is to update dyndns account.
* your password must be unique, new password will be made from 8 character in Hex code. ( 0,1,2,3,4,5,6,7,8,9,A,B,C,D,E,F. ).
do not confuse this new password from M line with:dyndns password, dreambox password or router password.
in line D: you will have your share partner with his details, dyndns name, your UDP port, his UDP port, his password and share parameter.
* Your port UDP ( yyyy ) will have to be redirected to local dreambox IP.
for this you will have to use a Router and to config that UDP packet that come to your Internet IP on chosen port ( yyyy )
to be forwarded on the same port UDP ( yyyy ) to local dreambox IP.
How to build your D line which you will give to your share partner:
D: { your_dydns_name_or_ip { xxxx yyyy { your_password { local_card_dist virtual_card_dist }}}}
in xxxx your share partner will enter his UDP port, leave it as xxxx.
yyyy - is your UDP port.
your_password = it is the same password as it is in M line.
local_card_dist = A5 this is the distance you want your local card to be visible, A is for special cards like SKY UK/IT.
virtual_card_dist = A5 this is the distance you want your virtual cards that come from other networks to be visible, A is for special cards like SKY UK/IT.
* Attention do not make confusion between your D line, you will give to your friends and friends D lines from your cwshare.cfg
* Attention do not make public your lines D&M or any D lines from cwshare.
# start cwshare.cfg config file
# allow maximum 06 share level for recieved card data
I: { 06 }
# 01 repeat EMM's
# 00 consider every EMM only once
# 01 restart pid on overflow
# 1* reset ENX on every channel change
# *1 check/reset ENX freezes on FTA
# *2 check/reset ENX freezes on PayTV
# *3 check/reset ENX freezes on FTA and PayTV
# 00 write nothing in atack.txt
# 01 write into atack.txt: password is wrong
# 02 write into atack.txt: ID unknown
# 04 write into atack.txt: IP is wrong
# 08 write into atack.txt: port is worng
# 10 write into atack.txt: share.stat
# 20 create online.log for online/offline logging
# 3F write everything. (combine bits for other combinations)
# 4000 send ecm again after 4 Seconds if no reply.
# 6000 resync decode after 6 Seconds if net decode failed
N: { 00 01 03 1F 4000 6000 }
# Send ECM's at maximum 5 cards (please use this as default)
X: { 05 }
# Send ECM's in any case to these card ID's, even they are more then X:
# some examples ...
#G: { 17020000 1234 }
#G: { 0B000000 ABCD }
#G: { 05021510 AB34 }
#G: { 0D03A000 A234 }
# For W: please read the cwshare.txt, here only some examples
# use card 1 only for the following pids
#W: { 01 02 02 } 1022 100A 100B 102B 1009 101D 1029 1014 1011 101B
# don't use card 2 for the following pids
#W: { 02 03 03 } 1008 1016
# S: is the same as W:, just using the SID instead of the ECMPID
# cwshare.cfg --- dbox1 --- Internet und Lokales Netzt
#
# password
M: { mydbox2.homeip.net { AA242456 }}
# Internet Friends port range password cod
D: { friend1.homeip.net { 8010 8010 { B142AB11 { 5 5 }}}}
D: { friend2.homelinux.net { 8010 8010 { 81BFF901 { 5 5 }}}}
# other local boxes
D: { 192.168.0.51 { 8020 8020 { AB333441 { 5 5 }}}}
D: { 192.168.0.52 { 8020 8020 { BA334B24 { 5 5 }}}}
# end cwshare.cfg config file
About G-Box Center
G-Box Center it is a plugin that will display informations about your share partners and virtual cards.
Panel with peers status, card shared, gbox ver, IP address... select a peer and press ok to have more detailed info.
Here you can see how many cards are come and from what distance, theoretically lower distance mean better speed.
This mean that cards that have Level 0 will not be re shared any more, cards with Level 1 can be re shared only once, Level 2 will be re shared 2 times till will reach level 0...
Here is displayed what providers can be accessed and with how many cards for each provider.
This image has been resized. Click this bar to view the full image. The original image is sized 570x456.
How to manual install G-Box Center:
copy egboxcenterd to /var/bin and set attrib to 755
copy this files to /var/tuxbox/plugins
egboxcenter.cfg
egboxcenter.so -set attrib to 755
Now go to Blue Panel - Plugins and select G-Box Center to start.
Tips
* If you start getting attack with bad port one cause can be that you are using v 2.20-2.25 and you receive to many cards >1024. Use PC log to check for this problem.
To fix this you have two options:
install gbox v 2.1b or
lower your I to 04 or 03 like this I: { 03 } and check your X parameter if is not to high; normal value it is X: { 05 }
* If you enter in your M line your IP then you can't have in D line dyndns name, only IP's.
* Here you have my ident & ignore list.
check how many cards you will have before and after; this list will ignore old/fake cards.
download ident & ignore list
Install in dir: /var/keys and restart gbox.
Gbox - there are few versions available: 2.1b, 2.20, 2.22, 2.23, 2.24, 2.25... I recommend you 2.1b or 2.25 if you receive <500 virtual cards .
DCC - Dreambox Control Center
optional plugin G-Box Center
Install DCC on your PC and set-up communication for your Dreambox.
Now you can start to install the files in your Dream.
copy gbox file in your dream in dir: var/bin.
Sett attribute 755 to this file.
- if you have you can copy this files and set attribute to 755 also.
s2issuer.b
s2provid.b
copy gbox_cam.sh in your dream to dir: /var/script
Sett attribute 755 to this file.
this is a listing of this script:
# start gbox_cam.sh listing
#!/bin/sh
########################################
###### Powered by The Gemini Team ######
### http://www.i-have-a-dreambox.com ###
########################################
# camid #
# 0000 = Commom Interface #
# 0001->0199 = for User Experiment #
# 0199 = Dccamd #
# 0200->0299 = Fbiss #
# 0300->0399 = Camd3 #
# 0400->0499 = Camx #
# 0500->0599 = Camx-radegast-cs #
# 0600->0699 = Evocamd #
# 0700->0799 = Evocamd-ronlad-cs #
# 0800->0899 = Mgcamd #
# 0900->0999 = Mgcamd-ronald-cs #
# 1000->1099 = Newcamd #
# 1100->1199 = Newcamd-ronald-cs #
# 1200->1299 = Newcamd-spider #
# 1300->1399 = Radegast #
# 1400->1499 = Ronald-cs #
# 1500->1599 = Scam #
# 1600->1699 = Scam-ronald-cs #
# 1700->1799 = Cardserver #
# 1800->1899 = Mgcamd with Cardserver #
# 9800->9899 = reserved #
# 9900->9999 = reserved #
########################################
CAMNAME="Gbox"
USERNAME=""
ZAPTIME=6
CAMID=970
DVBSET=1
INFOFILE="ecm.info"
# end
# This method cleans up /tmp folder of gbox files
remove_tmp ()
{
rm -rf /tmp/*info* /tmp/*gbox* /tmp/*online* /tmp/*share* /tmp/Newcs* /tmp/atack* /tmp/debug*
}
# This method starts Gbox
start_cam ()
{
/var/bin/gbox &
}
# This method stops Gbox and then calles the tmp cleanup method
stop_cam ()
{
touch /tmp/gbox.kill
/bin/prockill gbox
remove_tmp
}
case "$1" in
start)
echo "[SCRIPT] $1: $CAMNAME"
start_cam
;;
stop)
echo "[SCRIPT] $1: $CAMNAME"
stop_cam
;;
restart)
echo "Restarting $CAMNAME"
stop_cam
start_cam
;;
*)
"$0" stop
exit 1
;;
esac
exit 0
# end gbox_cam.sh listing
----------------------------
copy to dir: /var/keys your config files and keys.
- configuration files:
gbox_cfg
cwshare.cfg
softcam.cfg
rom02.b
rom02eep.b
rom02ram.b
rom03.b
rom03eep.b
rom03ram.b
rom07.b
rom07eep.b
rom07ram.b
rom10.b
rom10eep.b
rom10ram.b
rom11.b
rom11eep.b
rom11ram.b
- optional files with keys:
conax
irdeto
nagra
seca
via
- optional files:
ident.info - this is the file where providers codes are assigned to name for easy display with G-Box Center.
ignore.list - to ignore some providers, old, fake cards.
knowns.ini
priority.list
replace.list
now you will have to restart your Dreambox.
Go to Blue Panel and select Gbox, then select Start/Restart Cam to activate the Gbox cam.
For Gbox to work properly you will need to have in dir: /var/keys some configuration files:
gbox_cfg, softcam.cfg and cwshare.cfg ( cwshare.cfg wich you will have to build using your data), .
Here it is listing of gbox_cfg which you can copy/paste in a text file and save as: gbox_cfg if you don't have already.
# start gbox config file
# Trace/Debug
# xx yz ; xx=00 no konsole output
# xx yz ; xx=01 konsole output
# xx yz ; y=0 debug output (don't use)
# xx yz ; y=1 no debug output
# xx yz ; z=0 ouput to konsole
# xx yz ; z=1 output to /var/tmp/debug.txt
# xx yz ; z=2 Output to UDP (to capture with gboxt)
Z: { 00 12 } 192.168.1.4 8024
# Task type
# 00 ** normal mode gbox mode (no season, use Multicam instead)
# 01 ** Season Emulation in a Irdeto allcam chid 0602 nonZ
# 10 ** Season Emulation in a Irdeto allcam chid 1702 nonZ
# 11 ** Season Emulation in a Irdeto allcam chid 1702 Z
# 12 ** Season Emulation in a Irdeto allcam chid 1722 Z
# 13 ** Season Emulation in a Irdeto allcam chid 1762 Z
# ** *1 Com port to use for season emulatiom (1 or 2)
# ** 0* Use CTS für RST detection
# ** 1* Use DCD für RST detection
# ** ** 9600 = Baudrate to be used (working only on dbox2)
W: { 00 00 } 9600
# gbox working mode
# 00 pure Emu
# 01 pure SoftCam (when card inside), Emu (when no card inside)
# 02 pure Net Client
# 03 Mixed mode !!!!! always use this !!!!!
G: { 03 }
# Display ECM messages on Konsole
# 00 don't show any ECM's
# 01 show only valid ECM's
# 02 show valid and bad ECM's with complete data display
C: { 01 }
# Display EMM messages on Konsole
# *0 don't show any EMM's
# *1 show only valid EMM's
# *2 show valid and bad EMM's with complete data display
# 1* Log any tier change on PW-Nagra-17xx cards into /var/keys/pwupdate.log
M: { 01 }
# AutoUpdate
# 00 is ignored (default)
# 01 enable AU
# 02 Auto AU !!!!! always use this !!!!!
A: { 02 }
# Key update
# 01 update only new keys, default setting
# 02 update all keys (used for valid PMK checking)
U: { 02 }
# Hash pids
# 00 hash all pids, DO NOT USE THIS OPTION, IT IS ONLY FOR TESTING STUFF
# 01 hash only pids with implemented algos and available keys !!!!! always use this !!!!!
H: { 01 }
# Key files folder
# 00 keyfiles in /var/keys
# 01 keyfiles in /var/tmp
T: { 00 }
# On Screen Display for the Multysystemcam on com1/com2
# 00 No OSD (default)
# 01 display Smartcard messages in Neutrino
# 02 display Smartcard messages in Neutrino new nhttpd format
# 03 display Smartcard messages in Enigma
# mypass (use user=root and pass=mypass for nhttpd)
O: { 03 } 192.168.1.2
# Logger and NET-mode UDP port Init
# 00 do not init UDP port
# 01 Init UDP port for IP, port, UDP
L: { 00 } 10.0.0.3 8017
# demux, multicam/comport configuration
# *x ** ; x = device nummber to be used (0= default)
# D* ** ; force use of /proc/bus/gtx for cw write operations
(in the dbox2 the gbox writes directly the CW's, 00 is the
recommended mode ! No drivers are required) use D* ** ONLY if
you have Problems. 0* ** should be prefered !!!
# F* ** ; write CW's in both devices (used for PVR in STB04xxx devices)
# ** y* ; y=0001b (0x1*) use slot1 as Multicam (only on STB04xxx)
# ** y* ; y=0010b (0x2*) use slot2 as Multicam (only on STB04xxx)
# ** y* ; y=0011b (0x3*) use slot1 and slot2 as Multicams (only on STB04xxx)
# ** *z ; z=0001b (0x*1) use com1 as Multicam
# ** *z ; z=0010b (0x*2) use com2 as Multicam
# ** *z ; z=0011b (0x*3) use com1 and com2 as Multicams
# ** yz ; yz=00110011b (0x33) use slot1+slot2+com1+com2 as Multicams
# ** *z ; z=0100b (0x*4) invert CTS detection on com1
# ** *z ; z=1000b (0x*8) invert CTS detection on com2
# example: yz = 0x0A = 00001010 (use com2 with inverted CTS detection line)
V: { F0 10 }
# extra options to override default seting in case you expirience Problems,
# normaly these setings are not required.
#
# cpu, api, cw write method
#
# 00 auto
# 01 80X86
# 02 MPC823
# 03 IBM STB04xxx
# 00 auto
# 01 ibm
# 02 api2
# 03 api3
# 00 cw write style = use internal routine (only dbox2)
# 01 cw write style = CA_SET_DESCR type1 (dbox2, vdr)
# 02 cw write style = CA_SET_DESCR type2
# 03 cw write style = CA_SET_DESCR type3
# 04 cw write style = 16 byte /proc/bus/gtx
# 05 cw write style = 4096 byte /proc/bus/gtx, cw offset=0x04D0
# xx write cw in 1st device with index=xx
# yy write cw in 2nd device with index=yy
# 01 means with .index=0 (default)
# 02 means with .index=1
# 03 means with .index=0 and .index=1
# .. any bitwise combination ...
# FF means with all 8 indexes (0-7)
#J: { 01 00 00 01 01 }
# Files, folders, devices
# folder/device comment
#
#F: { 01 } /var/tmp/pmt.tmp // pmt file
#F: { 02 } /var/tmp/emm.info // key update log file
#F: { 03 } /var/tmp/ecm.info // ecm info file
#F: { 04 } /var/tmp/atack.txt // atack info file
#F: { 11 } /var/keys // folder for config files
#F: { 12 } /var/tmp // folder for temporary file
#F: { 13 } /var/keys // folder for keyfiles
#F: { 21 } /dev/dvb/card0/ca0 // ca device
#F: { 22 } /dev/dvb/card0/dvr0 // dvr device
F: { 23 } /dev/dvb/card0/demux0 // demux device
#F: { 31 } /dev/dvb/adapter0/ca1 // second ca device to write cw's (recording)
#F: { 41 } /dev/sci0 // STB04xxx slot1
#F: { 42 } /dev/sci1 // STB04xxx slot1
#F: { 43 } /dev/tts/0 // rs232 com1
#F: { 44 } /dev/tts/1 // rs232 com2
# For overclocking freaks, Clocking internal STB04xxx slots with:
# 1=7.80MHz 2=6.30MHz 3=5.25MHz 4=4.50MHz 5=3.94MHz 6=3.50MHz 7=3.15MHz
# Irdeto works fine on 7.8MHz, all other fine on 6.30MHz or 5.25MHz
# The Dream has not a clean clock signal, some cards that are sensitive will
# refuse to work even on 3.5MHz, thats why 3.15MHz is the default value there.
# On other STB04xxx recievers the same cards work with 6.30MHz
#
#F: { 51 } 02 // irdeto
#F: { 52 } 03 // seca
#F: { 53 } 03 // viaccess
#F: { 54 } 03 // nagra
#F: { 55 } 03 // crypto
#F: { 57 } 03 // conax
#F: { 58 } 03 // nds
# end gbox config file
Here it is listing of softcam.cfg which you can copy/paste in a text file and save as: softcam.cfg if you don't have already.
# SoftCam EMM Log configuration
#
# Save EMM data
# 00 Don't save anything (default)
# 01 Save processed EMMs (/var/tmp/emmproc.bin)
# 02 Save rejected EMMs (/var/tmp/emmblock.bin)
# 03 Save both EMMs
L: { 00 }
# Check additional OSC Frequency !!! ONLY FOR DBOX2 !!!
# 00 No Check (default)
# >0 Check on, Value in KHz , example 8MHz=08000
F: { 00 }
# Check additional Baurate for ATR !!! ONLY FOR DBOX2 !!!
# 00 No Check (default)
# >0 Check on, Value in bit/s, example 81861
B: { 00 }
# Enable TPScrypt Support
# *0 TPScrypt off
# *1 TPScrypt on (default)
# 1* don't use PTS on Viaccess cards
# 2* don't use PTS on Cryptoworks cards
# 3* don't use PTS on Viaccess and Cryptoworks cards
Y: { 01 }
# Empty RS232 buffer before writing
# 00 No reset
# 01 Reset Buffer (default)
E: { 01 }
# SoftCam Blocker/Filter definition
#
# 00 = Allow EMM (default for all)
# 01 = Block EMM addressed to:
# all card
# | shared address/provider
# | | unique address/hex_serial
# ----------------------------------
I: { 00 00 00 } Irdeto All SA UA
V: { 00 00 00 } Via - SA UA
S: { 00 00 00 } Seca - SA UA
N: { 00 00 00 } Nagra All SA UA
C: { 00 00 00 } Crypto All SA UA
O: { 00 00 00 } Conax - SA UA
D: { 00 00 00 } NDS All SA UA
# Timeout Definitions
#
T: { 00 02 01 } ATR timeout (normal*X), instruction timeout (normal*X)
# com1/com2 delays, all delays to be entered in decimal !
#
# Do NOT touch !!!!!!!!!!!!!!!!!!
# all timings should be 0, change only if you have problems.
T: { 01 00000 000 begin_of_the_skype_highlighting 01 00000 000 end_of_the_skype_highlighting } Irdeto : byte delay (1e-6 s), instruction delay (1e-3 s)
T: { 02 00000 000 } Seca
T: { 03 00000 000 begin_of_the_skype_highlighting 03 00000 000 end_of_the_skype_highlighting } Viaccess
T: { 04 00000 000 begin_of_the_skype_highlighting 04 00000 000 end_of_the_skype_highlighting } Nagra
T: { 05 00000 000 begin_of_the_skype_highlighting 05 00000 000 end_of_the_skype_highlighting } CryptoWorks
T: { 06 00000 000 } Geldkarte
T: { 07 00000 000 } Conax
T: { 08 00000 000 } NDS
# Use Crypto card bug to decode any CW, no matter of chid
#
# Cxxx configuration (is aktiv for the provider only if a config line is present)
# (ECM sample to be used to get the cw's with Cxxx)
#
# Provider provider chid - that is present on the card for that provider
# || || || ||
# UPC-Astra
8: { 8D } A4 4C 00 00 2E 20 00 2B 83 01 8D 8C 03 20 01 00 8E 02 00 00 C5 01 00 DB 10 00 00 00 00 00 00 00 00 00 00 00 00 00 00 00 00 DF 08 00 00 00 00 00 00 00 00
# Digiturk
8: { C1 } A4 4C 00 00 31 28 00 2E 83 01 C1 8C 03 89 19 19 8E 02 00 00 8F 01 A9 91 01 55 DB 10 00 00 00 00 00 00 00 00 00 00 00 00 00 00 00 00 DF 08 00 00 00 00 00 00 00 00
# Use constant CW's for
# caid pid CW0 ... CW1 ...
0: { 09 61 2E E5 { F0 07 84 7B F2 24 E9 FF 00 00 00 00 00 00 00 00 }
0: { 09 61 C3 57 { 86 FA 87 07 33 F2 AF D4 00 00 00 00 00 00 00 00 }
0: { 26 00 03 EB { 2D 4E 53 CE 6A 42 5F 0B 2D 4E 53 CE 6A 42 5F 0B }
0: { 26 00 03 E9 { 2D 4E 53 CE 6A 42 5F 0B 2D 4E 53 CE 6A 42 5F 0B }
0: { 26 00 03 EA { 2D 4E 53 CE 6A 42 5F 0B 2D 4E 53 CE 6A 42 5F 0B }
0: { 26 00 03 EC { 2D 4E 53 CE 6A 42 5F 0B 2D 4E 53 CE 6A 42 5F 0B }
0: { 26 00 03 ED { 2D 4E 53 CE 6A 42 5F 0B 2D 4E 53 CE 6A 42 5F 0B }
0: { 26 00 03 EE { 2D 4E 53 CE 6A 42 5F 0B 2D 4E 53 CE 6A 42 5F 0B }
0: { 26 00 03 EF { 2D 4E 53 CE 6A 42 5F 0B 2D 4E 53 CE 6A 42 5F 0B }
0: { 26 00 03 F0 { 2D 4E 53 CE 6A 42 5F 0B 2D 4E 53 CE 6A 42 5F 0B }
0: { 26 00 00 01 { 10 00 00 00 00 00 00 00 10 00 00 00 00 00 00 00 }
0: { 26 00 00 04 { 18 AA 00 00 C2 D3 28 00 18 AA 00 C2 C2 D3 28 00 }
0: { 26 00 00 03 { B9 8A C0 00 DE 11 03 00 B9 8A C0 00 DE 11 03 00 }
0: { 26 00 00 05 { AB CD EF 67 FE DC BA 94 AB CD EF 67 FE DC BA 94 }
0: { 26 00 1F 06 { 11 11 11 33 11 11 11 33 11 11 11 33 11 11 11 33 }
0: { 26 00 00 63 { 13 24 35 6C AC BD EF 58 13 24 35 6C AC BD EF 58 }
0: { 26 00 00 06 { 10 10 10 30 10 10 10 30 10 10 10 30 10 10 10 30 }
0: { 26 00 00 07 { 1A 2B 3C 00 4D 5E 6F 00 1A 2B 3C 00 4D 5E 6F 00 }
0: { 26 00 00 67 { DB A5 45 00 FD E3 62 00 DB A5 45 00 FD E3 62 00 }
#MINSK TV 53E
#0: { 26 00 00 01 { 10 09 19 32 36 24 62 BC 10 09 19 32 36 24 62 BC }
#ENTV 22W
#0: { 26 00 00 04 { 11 00 00 00 00 00 00 00 11 00 00 00 00 00 00 00 }
#TV7 INDO 108E
#0: { 26 00 00 04 { 44 C4 DE 00 7B 94 32 00 44 C4 DE 00 7B 94 32 00 }
Now about cwshare.cfg file:
in line M: you will enter your dyndns name or Internet IP with your password in hex.
* with dyndns name you will designate a name to your internet IP address, so when you will have another internet IP address all you have to do is to update dyndns account.
* your password must be unique, new password will be made from 8 character in Hex code. ( 0,1,2,3,4,5,6,7,8,9,A,B,C,D,E,F. ).
do not confuse this new password from M line with:dyndns password, dreambox password or router password.
in line D: you will have your share partner with his details, dyndns name, your UDP port, his UDP port, his password and share parameter.
* Your port UDP ( yyyy ) will have to be redirected to local dreambox IP.
for this you will have to use a Router and to config that UDP packet that come to your Internet IP on chosen port ( yyyy )
to be forwarded on the same port UDP ( yyyy ) to local dreambox IP.
How to build your D line which you will give to your share partner:
D: { your_dydns_name_or_ip { xxxx yyyy { your_password { local_card_dist virtual_card_dist }}}}
in xxxx your share partner will enter his UDP port, leave it as xxxx.
yyyy - is your UDP port.
your_password = it is the same password as it is in M line.
local_card_dist = A5 this is the distance you want your local card to be visible, A is for special cards like SKY UK/IT.
virtual_card_dist = A5 this is the distance you want your virtual cards that come from other networks to be visible, A is for special cards like SKY UK/IT.
* Attention do not make confusion between your D line, you will give to your friends and friends D lines from your cwshare.cfg
* Attention do not make public your lines D&M or any D lines from cwshare.
# start cwshare.cfg config file
# allow maximum 06 share level for recieved card data
I: { 06 }
# 01 repeat EMM's
# 00 consider every EMM only once
# 01 restart pid on overflow
# 1* reset ENX on every channel change
# *1 check/reset ENX freezes on FTA
# *2 check/reset ENX freezes on PayTV
# *3 check/reset ENX freezes on FTA and PayTV
# 00 write nothing in atack.txt
# 01 write into atack.txt: password is wrong
# 02 write into atack.txt: ID unknown
# 04 write into atack.txt: IP is wrong
# 08 write into atack.txt: port is worng
# 10 write into atack.txt: share.stat
# 20 create online.log for online/offline logging
# 3F write everything. (combine bits for other combinations)
# 4000 send ecm again after 4 Seconds if no reply.
# 6000 resync decode after 6 Seconds if net decode failed
N: { 00 01 03 1F 4000 6000 }
# Send ECM's at maximum 5 cards (please use this as default)
X: { 05 }
# Send ECM's in any case to these card ID's, even they are more then X:
# some examples ...
#G: { 17020000 1234 }
#G: { 0B000000 ABCD }
#G: { 05021510 AB34 }
#G: { 0D03A000 A234 }
# For W: please read the cwshare.txt, here only some examples
# use card 1 only for the following pids
#W: { 01 02 02 } 1022 100A 100B 102B 1009 101D 1029 1014 1011 101B
# don't use card 2 for the following pids
#W: { 02 03 03 } 1008 1016
# S: is the same as W:, just using the SID instead of the ECMPID
# cwshare.cfg --- dbox1 --- Internet und Lokales Netzt
#
# password
M: { mydbox2.homeip.net { AA242456 }}
# Internet Friends port range password cod
D: { friend1.homeip.net { 8010 8010 { B142AB11 { 5 5 }}}}
D: { friend2.homelinux.net { 8010 8010 { 81BFF901 { 5 5 }}}}
# other local boxes
D: { 192.168.0.51 { 8020 8020 { AB333441 { 5 5 }}}}
D: { 192.168.0.52 { 8020 8020 { BA334B24 { 5 5 }}}}
# end cwshare.cfg config file
About G-Box Center
G-Box Center it is a plugin that will display informations about your share partners and virtual cards.
Panel with peers status, card shared, gbox ver, IP address... select a peer and press ok to have more detailed info.
Here you can see how many cards are come and from what distance, theoretically lower distance mean better speed.
This mean that cards that have Level 0 will not be re shared any more, cards with Level 1 can be re shared only once, Level 2 will be re shared 2 times till will reach level 0...
Here is displayed what providers can be accessed and with how many cards for each provider.
This image has been resized. Click this bar to view the full image. The original image is sized 570x456.
How to manual install G-Box Center:
copy egboxcenterd to /var/bin and set attrib to 755
copy this files to /var/tuxbox/plugins
egboxcenter.cfg
egboxcenter.so -set attrib to 755
Now go to Blue Panel - Plugins and select G-Box Center to start.
Tips
* If you start getting attack with bad port one cause can be that you are using v 2.20-2.25 and you receive to many cards >1024. Use PC log to check for this problem.
To fix this you have two options:
install gbox v 2.1b or
lower your I to 04 or 03 like this I: { 03 } and check your X parameter if is not to high; normal value it is X: { 05 }
* If you enter in your M line your IP then you can't have in D line dyndns name, only IP's.
* Here you have my ident & ignore list.
check how many cards you will have before and after; this list will ignore old/fake cards.
download ident & ignore list
Install in dir: /var/keys and restart gbox.
Subscribe to:
Posts (Atom)